Pages

Wednesday 7 December 2011

The "Bush in a Box"...

Hi all,
Thought it was time for an update of some projects.  I've mainly been spending some time on my "bush in a box" diorama, that was started some time ago, but like many other projects, had some distractions along the way.  The influence for this type of project comes from fellow scenery master, Geoff Nott (of Red Stag and Muskrat Ramble efforts), who many of you will be familiar with Geoffs modelling pieces.  Geoff has created a number of boxed diorama's featuring his talents for very dense scenery.  Generally, his diorama's feature the trees cut off by the top of the box, creating a cropped view into the bush setting.  After I began making my taller gum trees and Mountain Ash pieces, I wanted a way to show of their size (cutting them off to fit in a box didn't seeem to do them justice) and get them into a nice scene for taking to exhibitions to display, so have taken the bush box concept, and basically added a heap more height...


This box I have been working on, likely to be called "Splitters Gorge", stands around 1000mm tall, 700mm across, and just 500mm deep.  The added height made the back scene a bit more of a challenge, as there was a full height of scenery to try and cover.  I toyed with a photo backdrop, but covering that full scene wasn't working, so I opted to paint one in oils.  The effect I was after was the slightly blurred distant scenery, and not too detailed to draw away from the main foreground scenery.  Once the trees start going in front of the painted backdrop, I think its fairly effective...


This type of scenery chews up heaps of trees.  This small ridge along the top of the diorama is only about 150mm deep (6"), and has already taken up about two dozen of the gum trees (not to mention all the other filler bush foliage and smaller trees, grass, ferns etc).  Most of what is scene here will be faily obscured once the foreground scenery goes in, but the background wiil be visible to those that look hard enough into the scene.  Its all about the depth and density.

The more recent stages of the diorama (now the background work is done) is the start of the waterfall and moss covered rock face.  Slowly starting to build up the green spread over the wall, and then start to texture in the water stages as the falls cascade down the gorge and into the small creek.  Again, much of this detail will be masked by the dense bush scenery, but needs to be there for the effect.  The moss was first "mapped" in with a goopy mix of PVA, fine ground foam, and green paint, for texture.  The second pass was with an airbrush to soften out the moss effect.  Still a few more stages to work with on this part...


Here's a bit of a reference image for the type of moss covering I'm heading towards, taken on one of the family bushwalks in Lorne, Victoria.  Its not a heavy moss, but more of a thin film that just gathers within the dampness from the waterfall.


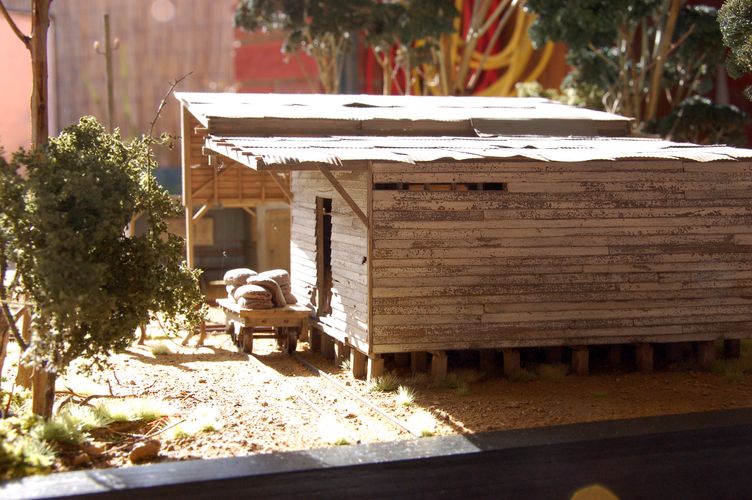
Finally, a quick shot of the small bush hut that will be part of the diorama, sitting at the base of the gorge.  I wanted to place a man made structure into the scene to help with setting the scale and perspective of the surrounds.  Its made from basswood over a matte board shell.  Once in the scene, there will also be a few surrounding details to indicate the workings of bush living.

Thats about where it is at the present.  Hopefully some time off work around Christmas will allow some time to work on a few more trees for the scene.  I am hoping to have this one finished in time for the "Southern Forests" meeting for fellow narrow gauge enthusiast, down in Puffing Billy country next March.

Cheers,
Dan

Wednesday 26 October 2011

New books and bits on the bench...

Hi all,
 Bit of a quick update an review of some of the new things that have landed on the workbench in this last month.  First of all, following my tree clinics from the recent NMRA Convention (and thanks to all for the good feedback), I had a chance to browse through a brilliant tree modelling book, and had to own a copy.  The book is "Modelling Trees, part one - Broadleaf Trees", by Gordon Gravett.  I was semi-familiar with some of Gordon's fine modelling from some magazine articles I had seen on his layout, "Pempoul".  This soft cover book is 92 pages of some of the finest modelled trees I think I have seen.  Superb photos, well documented step by step images and descriptions, and easy to read instructions make this a really cool resource for model tree builders.  One of the points that is made in the book, is the estimated time required to model some of these wonderful trees (often 10-20 hours per tree!).  It highlights the simple fact, that be prepared to spend the time, and the results are far more rewarding.  The book covers the modelling of elms, oaks, ash, silver birch, willow and beech trees, as well as ivy, hedgerows, and even birds nests.  I certainly look forward to giving a number of these techniques a try in the future.


Also new to the bench, was a few fine laser cut detail pieces from VectorCut.  Turns out, I'd been on the hunt for some 1/48 padlocks for some little detail features on door latches.  Knowing that Dave at VectorCut had done some crazy small details (I mean HO scale hamburgers and hot dogs, that need assembly!), I asked him if he would consider doing a set of mixed padlocks.  A few weeks later, he sends me the link to the new product on his site, saying thanks for the idea.  I had previously picked up some of the VectorCut tools and gears sets, so knew what to expect.  Well, the padlocks arrived (I also ordered some car parts for a future diorama), I wasn't disappointed.  They're laser cut in laserboard, etched in detail, and include skeleton keys!  NUTS!!!  His site is worth checking out just to see what other crazy details he has chosen to cut...recommended browsing (and not bad value either).


I also recently ordered in a number of castings from The Aspen Modelling Company.  I've known that these were really nice castings for a while, but took a while to get around to finally ordering some.  Some of you may be familiar with these figure and animal castings from some of the 1/48 animations the Laurie McLean MMR has been featuring on YouTube for the last few months.  The castings are pretty clean, minimal flash, and really nicely detailed pieces.  I picked out a number of the horses (will be needing a few of these for a future blacksmith/farrier scene), and a couple of the figures as well.  Prices again, very reasonable, and postage was great, just $6 for overseas orders.  I don't doubt I'll be back for more of these castings in the future.


And lucky last, a few detail parts came in from Sierra West Scale Models.  I suspect most modellers would have heard of this manufacturer before...well recognised for some well designed kits, but probably equally recognised for the detail castings that complete the kits.  I finally got around to ordering a few of these details as well (available as individual items, so you don't have to buy the whole kit just to get the detail castings).  Another set of superbly cast details, and I look forward to going a bit cross eyed painting them up.

At least I can't say I've got nothing to do in my spare time.  Plenty to read, plenty of small parts to paint.  On top of that, I've been playing with some LED strip lighting pieces as possible replacements for the old heavy fluoro tubes I would normally use to light layout modules (that will be a future blog report).  The new Outback Model Company kit, "Carver & Dawson", is due to hit any day now, so there's another project to pass the time.  I've been able to watch this kit develop slowly over the last 6-8 months, so its great to see it finally going into the box.

As something different to also throw in the mix, I sat down and had a chat via Skype with Jimmy Simmons, which has been recorded as an interview for the October edition#53 of "The Scotty Mason Show" podcast.  It was a fun chat, and I don't think I used too much local slang to confuse the wider audience.

Cheers,
Dan

Monday 10 October 2011

The NMRA Convention wrap...

Hello gain, and I'm back now from a tiring, but certainly enjoyable and inspiring weekend at the 2011 Australasian NMRA Convention, held up in Melbourne.  I headed up on the Friday afternoon to assist with setting up the venue for the weekend, before enjoying two days of interesting clinic topics and conversations on a mixed bag of model railway subjects.  It was a fairly intimate event, with about 80 attendees.  The venue made it look like a small crowd, but it was all good company.  Early starts and late nights, with lots of ideas to think about while laying in bed at night can make a young-ish body weary.

Across the two days, we got to hear a good range of topics presented in either lecture or workshop formats, from DCC LED applications, casting techniques, CNC milling with live demonstrations, various discussions on model development and techniques, as well as a number of talks on some prototype settings and modelling thoughts. As well as that, I was also there to host a couple of workshops on how I go about building my gum trees, which was well supported by all, and I was happy to receive plenty of positive feedback (as well as some good after discussions brain storming some new ideas).  Thanks to Mario Rapinett for the couple of shots during the clinic.  I'll add here a link to my clinic notes on how I do these trees (its a 10.4MB file as a word of warning)...


As well as the clinics and workshops, a couple of traders supported the event, with thanks to Brunel Hobbies, Outback Model Company, Narrow Gauge Downunder, and Fine Art Model Trains, for being there to happily accept some modellers hard earned dollars. 

There was also the modelling competition that is usually a part of such an event.  I was quite happy to accept the award for best diorama (with my Kawarren piece, as featured in the previous blog posting), as well as the "Rick Shoup Award" for best model of an Australian/New Zealand prototype.  I also thought I'd have the Kawarren goods shed structure judged under the NMRA criteria, and was happy to score a merit of 108/125 with it.


And then here's a selection of images from across the weekend.  Congratulations to those others who were awarded in the various competition categories.  If I could have one slightly negative thing to report from the weekend, it was the perhaps low number of participants in the said competitions.  I would prefer to see more entries to this area, even if the model is not entered with the intention to receive any awards (I don't neccessarily enter things with the prize in mind, although I do like to offer my best work), but to atleast put more on offer for fellow modellers to admire and discuss during the show.

There was a number of private layout tours available for the Sunday afternoons entertainment, with a mix of scales and gauges to visit, but I had a long drive ahead of me, so opted not to head out and visit any of these (another day maybe).


 Thanks to the organising committee of the 2011 Melbourne NMRA Convention for the hours dedicated to planning such an event.  Its a tiring job with little reward, but their efforts were thoroughly appreciated by all in attendance.

Cheers,
Dan


Wednesday 14 September 2011

The Kawarren Project...

 
As I mentioned earlier, one of my main modelling interests is in Victorian Railways narrow gauge operations, primarily the operations of the Beech Forest line, or "The Beechy".  One of the points along that line was a stop called "Kawarren", located about 20km from Colac.  From a modelling perspective, it was an interesting point along the line due to the unusual shape of the goods shed there (with the added on covered loading side), and the way it was a meeting point for a 2'7" horse tramway (pictured above) that delivered lime from the nearby lime pits, as well as a couple of other timber tramway lines converging as a delivery point for loading to the narrow gauge line. 

I have intentions to bring this part of the Beechy to life as a future exhibition layout.  I am not setting any deadlines on this one though, as I have several hundred gum trees to make, as well as all the locomotives and rolling stock.  I started with what will likely be the only structures on the layout, with the goods shed and mallee shed ("station" of sorts), and have built them into a diorama, which is about 50cm x 50cm.  One of the other reasons for doing this diorama was to also have a testing piece for the gum trees I'd been making.  They had previously just been on storage boards, so it was nice to see how well they worked on a proper scenic piece.  I'll upload a couple of quick pics of the diorama now, but there is still a fair bit of final detailing to add to the scene (such as NQR 203, as in the photos above, and some more stuff stored around the shed, like wagon tarps and misc goods).  It will remain as a diorama for some time, but is intended that it will eventually become the focal point of the future layout.  The figure is one of the MK35 guys that I mentioned in a previous posting, with the horse one of Ian Lindsay's fine castings.  It was a fun and challenging one to build, since as a stand alone structure, all the attention was going to be on it, so I detailed it as finely as possible.  Where able, I have tried to match the boards to the photos (as far as split or broken pieces, from the two sides of the shed that were visible), and have finished it with a peeled paint which I was able to reference from a 2 second grab on some archive film footage of the line.

Cheers,
Dan


Tuesday 13 September 2011

Workbench update...

Right then...here's a few shots of recent/current projects from my workbench.  First up, I got around to putting together my rural church kit, which was one of the most recent offerings from Outback Model Company
 This quaint little structure will tie in perfectly with the small township I will be modelling on my Triple Creek home On30 layout. Was able to get the kit together fairly quickly and trouble free, with the longest process preparing and aging all the weatherboards pre assembly.  I was aiming for an aged, but not delapidated structure.  The timber would have taken a bit of sunburn from the Aussie sun, but still have some osrt of proud presentation to the community.  Also on the cards from the same manufacturers is a small rural schoolhouse (still just a mock up), which will go hand in hand with the church on my layout, since many churches also ran the local school.  There are still a few parts to complete with the church, such as the front steps, but these will be installed on site once I develop the landscape for it on the layout. 

Also underway on the bench are a number of VR narrow gauge rolling stock, as offered by Ian Lindsay Models.  These are very nicely cast reproductions of the 2'6" wagons run on the likes of the Beechy, Gembrook (Puffing Billy) and Walhalla line around Victoria.  So far I have assembled 2 NU vans, a NT and a NH (both of which there were only one of in their class). The wagons have been primed and await further painting and finishing, assembly of the white metal fox trucks, and finally some couplers. 
With the exception of the NH van, I am intending to paint these as some of the rolling stock that was in use on the Beech Forest line in the 1940-50's.  The bulk of my rolling stock collection will consist of the common NQR wagons, with  a variety of loads, such as potatoes, lime, timber and general goods.  Also to join the fleet will be a number of NBH passenger cars, to run the odd tourist special on the line.

Another of the small projects that gets picked up when in the mood, or when I get a short burst of modelling time, is adding some life and colour to the figures that will populate the scenes.  Here's a few of the local's that I've been finishing off lately.
Mainly a collection of Phoenix and Buffalo Landing figures, which I enjoy for their quality of casting and nice details in the facial features.  I also recently picked up a number of the 1:48 figures on offer by MK35, which I have yet to start painting, but have started to assemble and prime.  Often I have a selection of these figures to pick up and tinker with when modelling at exhibitions, as they are handy little jobs to complete while the glue/paint dries on the main projects.

Thought it might also be interesting to add in a recent photo of the current state of the modelling room.  Believe it or not, underneath all that is actually some working track.  Until I get around to introducing some landforms and scenery shape, its all too tempting to use what ever flat surfaces I have as work storage spaces.  My kids keep asking if they can come in and drive a train.  If they can find a spare couple of feet of track that isn't covered over with "current projects", I'll let them come in and run a train. There's a small space about 6" square down on the bench which is the common workspace, and so far, I don't think I've lost track of where anything is.  This is actually still a clean view...you should see under and above the layout space.  Like I said...got about 10 years to clean this room up!
Cheers,
Dan